Difference between revisions of "Sensor Arduino Lab 2013"
| Line 15: | Line 15: | ||
* Mount the bread board on your perfboard as shown in the picture below, so that the higher numbered rows are facing the USB and ethernet ports. | * Mount the bread board on your perfboard as shown in the picture below, so that the higher numbered rows are facing the USB and ethernet ports. | ||
* Insert your Arduino Nano into the bread board all the way at the end toward the higher numbered rows and seated roughly in the middle (see below). | * Insert your Arduino Nano into the bread board all the way at the end toward the higher numbered rows and seated roughly in the middle (see below). | ||
| − | |||
| + | <center> | ||
| + | [[Image:EmptySatellite2.jpg|400px]] | ||
| + | (Board shown is Beagle Board xM instead of Raspberry Pi, but the idea is the same) | ||
| + | </center> | ||
Revision as of 19:00, 3 August 2013
Due Wednesday at 9AM
This lab most recently revamped by Edgar Berdahl. Parts of it are by Wendy Ju, Chris Carlson, and others (possibly Bill Verplank)
For this lab you need your Satellite CCRMA kit, a laptop computer with Ethernet adaptor to program it, and some headphones with a mini 1/8" (2.54mm) stereo jack.
You are also invited to bring the following optional items, but they are by no means required:
- Some of your favorite breadboardable sensors and LEDs.
- A set of small, battery powered speakers with 1/8" (2.54mm) jack.
Contents
Mount Arduino And Bread Board
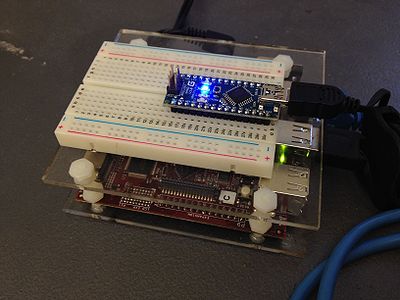
- Mount the bread board on your perfboard as shown in the picture below, so that the higher numbered rows are facing the USB and ethernet ports.
- Insert your Arduino Nano into the bread board all the way at the end toward the higher numbered rows and seated roughly in the middle (see below).
(Board shown is Beagle Board xM instead of Raspberry Pi, but the idea is the same)
Power Up and Prepare Arduino
- Use the same procedure as described before to power up Satellite CCRMA and login as the user ccrma with the password temppwd.
- After you are logged in, see which devices are attached to Linux by running the command following command. They will appear the be files. Wow, there are so many!
ls /dev
- To list only the serial interface devices type
ls /dev/tty*
- Now use the retractable USB cable to plug the Arduino into one of the USB ports of the Beagle Board. As the Arduino powers up, you should see some lights come on.
- Now run
ls /dev/tty*
again, and you should now see the new device /dev/ttyUSB0 appear also, which represents the Arduino Nano.
Troubleshooting: If you do not see /dev/ttyUSB0, then try rebooting using sudo reboot to see if that fixes this problem. (If you reboot, this will take about 45 seconds, and you will have to login again using ssh. If that doesn't work, come talk to us. If you are a Linux pro, you can try to debug the problem yourself by typing dmesg and looking at the result.)
- The next step is to install some simple firmware onto the Arduino so that it knows what we want it to do. Start the Arduino software in the terminal by typing
arduino &
- Open StandardFirmata from the Arduino software pull-down menus File|Examples|Firmata. Look at the program. This is what will control the Arduino.
- Select Arduino Nano w/ ATMega328 under Tools->Board and /dev/ttyUSB0 under Tools->Serial Port. Then hit the Play button to verify and compile the program.
- Upload the Firmata firmware to your Arduino Nano using upload button, the second square button from the left (the one with the sideways arrow).
- Close the Arduino program by closing all of the Arduino windows. (This is important because it frees up the USB serial port so that Pd can talk to the Arduino board later.)
Routing Power On The Breadboard
- When changing the circuit on the breadboard, it is a good idea to unplug the USB cable from the Arduino, so unplug it for now.
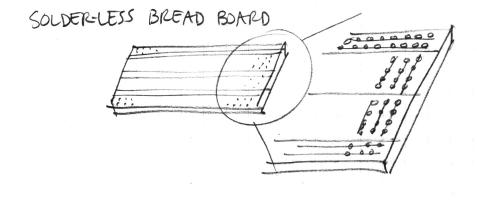
- Remind yourself about how the sockets on the breadboard are wired together:
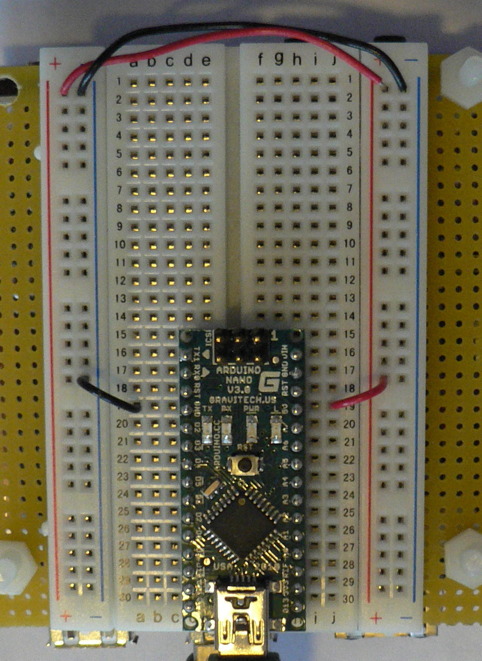
- Now connect jumper wires as shown in the image below so that the upper and lower long columns can serve as a power supply for your future circuits.
- Connect a short jumper from row 19 on the left (which connects to the GND pin of the Arduino) to the blue column.
- Connect a short jumper from row 19 on the right (which connects to the 5V pin of the Arduino) to the red column.
- Finally, use two longer jumpers to connect together the blue columns and the red columns as shown below:
- Check your wires now to make sure that you did it correctly!
- Now plug the USB cable back into the Arduino. You should see the blue light come back on on the Arduino. (If you don't, you have a short circuit! In other words, somehow you connected the wires together incorrectly, effectively connecting the 5V and the GND pins of the Arduino together. Unplug the USB cable again immediately and fix the circuit! Short circuits are big no-nos because they can (and often do!) destroy the Arduino. This is why we recommend unplugging the USB cable while you are changing your circuit.)
Power an LED (Always On)
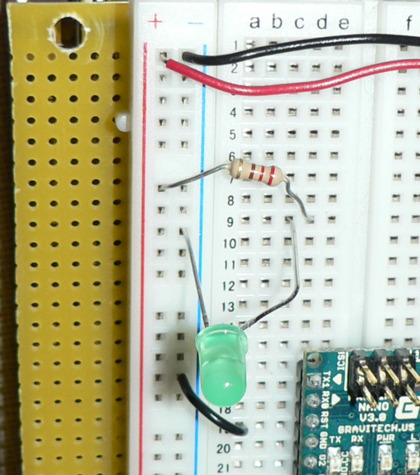
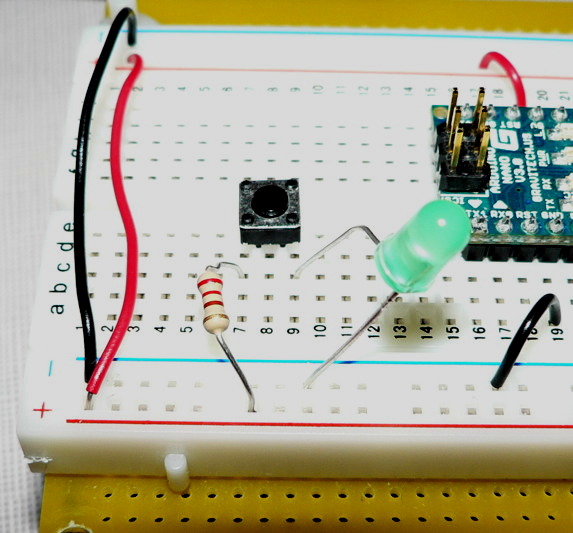
- Unplug the USB from the Arduino Nano and build the above circuit on your breadboard. Use a 220 Ohm resistor (red red brown gold -- see this page about resistor color codes).
- Plug in the USB connector briefly to the Arduino Nano to verify that the LED comes on.
- Because the LED is a diode, it has a set voltage drop across the leads; exceeding this causes heat to build up and the LED to fail prematurely. So! It is always important to have a resistor in series with the LED.
- Also, another consequence of the LED being a diode is that it has directionality. The longer lead, the anode, should be connected towards power; the shorter, cathode, should be connected towards ground. (In the photo, the longer lead has a bent "knee.")
Make a Light Switch
Next, we'll insert a switch into the circuit. The momentary switches in your kit are "normal open", meaning that the circuit is interrupted in the idle state, when the switch is not pressed. Pressing the switch closes the circuit until you let go again.
Use a multimeter to see what happens to the voltage on either side of the LED when you press the switch.
The Patches Are Already On The Board
You can find them in /home/ccrma/pd/labs-Music-250a-2011/lab2
Test the Switch Sensor Circuit
- Unplug the USB from the Arduino to cut the power for a moment.
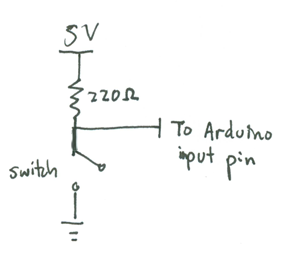
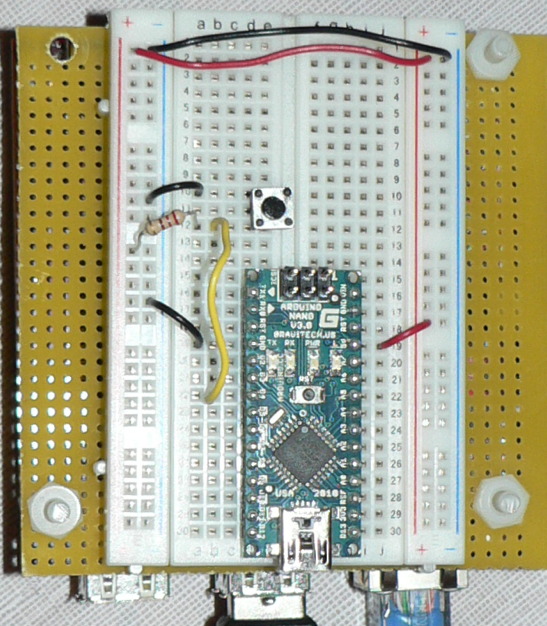
- Build the simple switch circuit:
When the switch is open, the Arduino pin (set to input mode) is pulled to 5V - in software, we'll read Arduino.HIGH. When the switch is closed, the voltage at the Arduino pin falls to 0V - in software, we'll read Arduino.LOW. The pull-up resistor is used to limit the current going through the circuit. In software, we can check the value of the pin and switch between graphics accordingly.
- Plug the power back into the Arduino and start the Jack audio server by executing the command
qjackctl & and then clicking on the start button.
- Start pd by typing
pd &
- Open the patch arduinoLab.pd
- Make sure that upon opening it says something like
[comport] opened serial line device (/dev/ttyUSB0) Or if it could not open /dev/ttyUSB0, then choose among the other serial port #'s until you see the appropriate message.
- Check that communication with the Arduino is working by doing the following: set the data direction for pin 13, which is wired directly to the LED on the Arduino, to OUTPUT. Then, toggle the digital output for 13, and verify that this causes the light connected to D13 to turn on and off. If not, then please ask for help in debugging the connection to the Arduino before continuing. Otherwise, you are good to go!
- Now reconsider the pin that you have attached the switch to. First set the data direction for this pin to be input.
- Make sure that you can can see the X for the corresponding digital input change when you press the switch.
Buttons, Switches and LEDs (Optional)
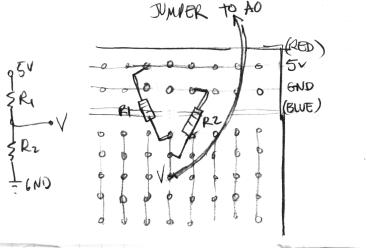
- Here's how to wire a simple 2-resistor circuit on the solderless bread-board (for example R1 = 10K, R2 = 10K):
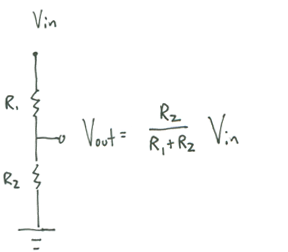
Use the voltage divider equation to calculate hypothetically what A0 should be.
Optional: Use the digital multimeter to check the voltage at A0. Set it to the direct current voltage "DVC" scale at 20V. On the multimeter, connect the black probe to COM and the red probe to V-Ohm-mA. Connect the other end of the black probe to ground and the red probe to the A0 wire. Also optional: Use the digital multimeter to find out what the "5V" supply actually is.
Using Analog Sensors
Now we will work with the continuous input values provided by analog sensors - potentiometers, accelerometers, distance rangers, etc.
First Analog Sensor Circuit: Potentiometer
- Close the pd patch to effectively close the serial connection between pd and the Arduino. (Only one program can be accessing the Arduino at a time!)
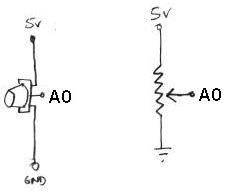
- Disconnect the USB power from the Arduino and connect a potentiometer up to analog input A0 of the Arduino. Here is the circuit:
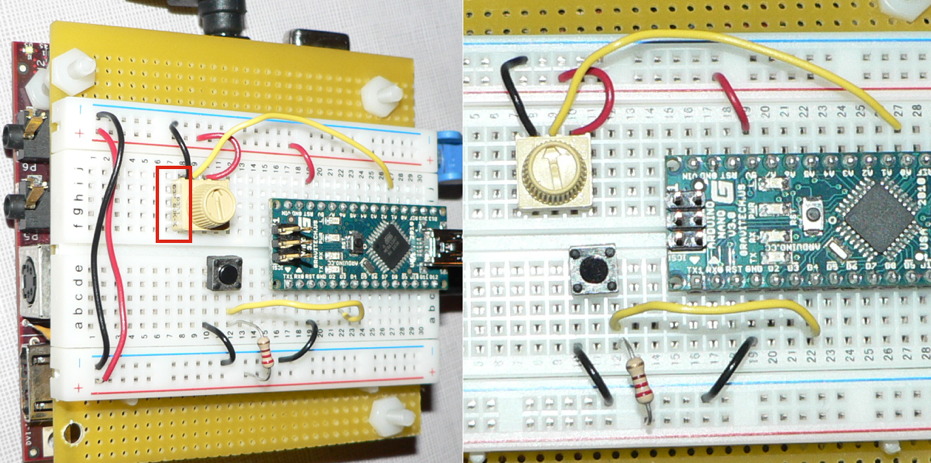
- And here is a possible way to make the circuit on your breadboard, as shown from two vantage points. Note that if you make the text on the potentiometer face the same way as shown below, then you can avoid accidentally plugging two of its pins into the same row (i.e. inadvertently shorting those two pins together).
- Then open the pd patch again and look at the result. When you turn the knob clockwise, the a0 value shown in pd should increase.
- How can you change the circuit so that turning the knob clockwise decreases the a0 value shown in pd?
Other Voltage Dividers
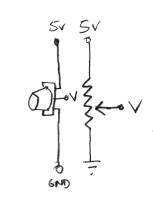
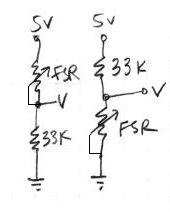
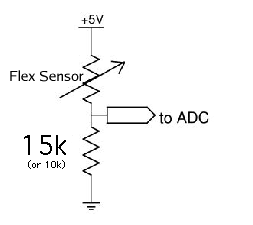
The circuit you just used for the potentiometer was a voltage divider circuit in which the potentiometer serves as two resistors. Other resistive sensors only have two wires, so to build a voltage divider with them, you need to combine them with a second, fixed resistor. Examples in your kit are the force sensitive resistor (FSR) and the bend or flex sensor. The idea is that you put two resistors in series between power and ground: one that changes resistance (your sensor), and one of a known, fixed resistance. At the point in between the two resistors, you can measure how much the voltage has dropped through the first resistor. This value changes as the ratio of resistances between variable and fixed resistors change. More formally:
- potentiometer:
- force-sensitive resistor (FSR):
Try both circuits. Test the resistance range of your sensor. If you want 2.5 volts to be the middle, make the comparison resistor (33k in the diagram) the "average" value of the FSR's resistance. Test this with a multimeter.
- Bend Sensor
Tilt control with an Accelerometer (Optional)
The accelerometer doesn't work using a voltage divider, but it does produce an output voltage that can be connected directly to an analog input of the Arduino.
In this example, we'll simulate the motion of a ball on a tilting plane in software and control the tilt through a sensor. Think of it as a first step to build your own electronic game of Labyrinth. The right sensor to use is an accelerometer. Accelerometers can report on both static and dynamic acceleration -- think of static acceleration as the angle the accelerometer is held with respect to the ground (the acceleration measured here is due to gravity). Dynamic acceleration occurs when you shake the sensor.
The accelerometer in your kit is a 3-axis, +/- 1.5-6g accelerometer sensor (1g is the acceleration due to gravity). You will have to solder on 0.1" header pins to fit this into the breadboard. The connections you need to make are Vin to 5V power from the Arduino , G to ground, and Xo, Yo & Zo to the first three analog input pins on the Arduino board. By default, the acceleration range is set to +/- 1.5g; you could solder on the gsel jumpers if you want less sensitive/greater range with +/- 6g.
Now, get a feel for the data the accelerometer provides. Use the Light Dimmer presets, which will track analog values on A0 and A1. Then pick up the Arduino+accelerometer board and tilt it in various directions. Start by holding it so that the accelerometer board is parallel to the ground. Find in which direction the X reading increases and decreases; do the same for the Y reading.
Next, change the PD patch so that you can also read the Z axis of the accelerometer.
Putting it all Together
- Create a patch to make sounds based on button and sensor values from the Arduino. You can try to adapt your patches from Lab 1, or come up with a new patch. Try to make the sound good!
- Make a simple musical interaction. Think about music -
- does it have dynamics?
- can you turn the sound off?
- can it be expressive?
(OPTIONAL) Light an RGB LED!
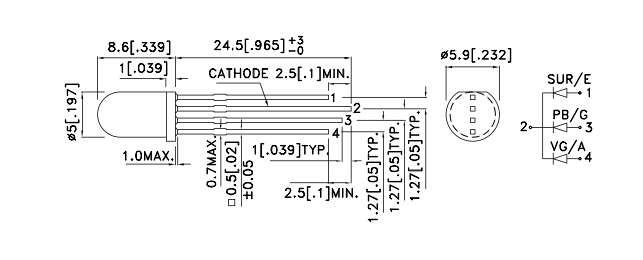
Included in your kit is a common-cathod RGB LED. Unlike the other LEDs, this LED has four pins instead of two. By using the Pulse Width Modulation Control, you can get the led to cycle through different parts of the colors spectrum.
Here is the schematic for the LED from the data sheet:
You can see that the longest lead is the common cathode (which should go to ground). The each of the other pins should be powered from the Arduino (ideally through PWM-capable pins) through a low-value resistor (~220 Ohm).
